How to install and configure the fuel-monitoring tracker
Installing and configuring a fuel-monitoring tracker involves several steps, depending on the specific model and manufacturer. Here’s a general guide that outlines the common steps involved:
1. Selecting the Fuel-Monitoring Tracker
- Choose a tracker that meets your needs and is compatible with your vehicle or fleet management system.
- Ensure it has the features you require, such as GPS tracking, fuel level monitoring, data logging, and real-time alerts.
2. Gathering Tools and Materials
- Fuel-monitoring tracker device
- Wiring kit and connectors
- Installation manual provided by the manufacturer
- Tools such as screwdrivers, pliers, and wire cutters
- Vehicle service manual (optional, for specific vehicle wiring details)
3. Preparing for Installation
- Park the vehicle in a safe, well-lit area.
- Turn off the engine and disconnect the battery to ensure safety.
4. Installing the Tracker
- Mounting the Device: Secure the tracker in an appropriate location. This is usually in the cabin, under the dashboard, or in the engine bay.
- Connecting Power: Connect the power wires of the tracker to the vehicle’s electrical system. This typically involves connecting to the vehicle’s battery or fuse box.
- Red Wire: Positive power source.
- Black Wire: Ground connection.
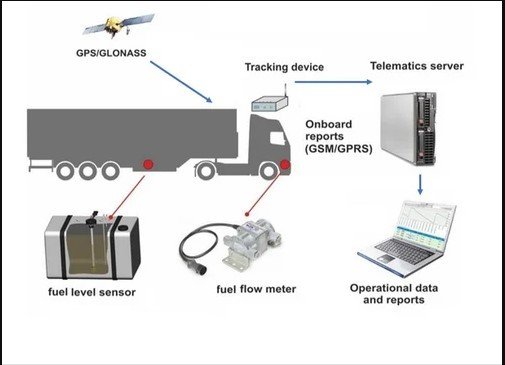
- Connecting to Fuel Sensor: Connect the tracker to the fuel sensor. This may involve tapping into the fuel gauge signal wire or using a dedicated fuel level sensor.
- GPS Antenna (if applicable): Mount the GPS antenna in a location with a clear view of the sky, such as on the dashboard or rear parcel shelf.
5. Wiring and Securing Connections
- Use wire connectors to make secure connections.
- Ensure all connections are insulated and protected from moisture and dirt.
- Use zip ties to secure wires and prevent them from moving or getting damaged.
6. Configuring the Tracker
- Power On: Reconnect the vehicle battery and power on the tracker.
- Initial Setup: Follow the manufacturer’s instructions to set up the tracker. This may involve using a mobile app, web interface, or dedicated software.
- Calibrating the Fuel Sensor: Calibrate the fuel sensor according to the manufacturer’s guidelines. This might involve setting the fuel level when the tank is full and empty to ensure accurate readings.
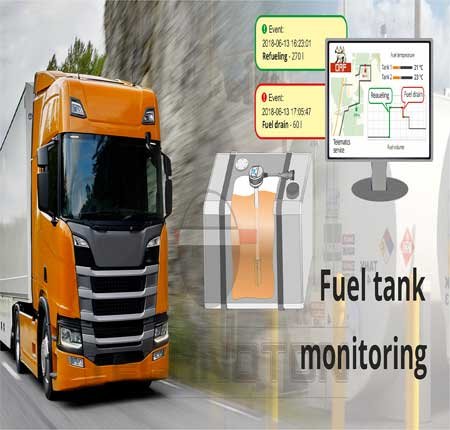
- Setting Alerts and Preferences: Configure alerts for fuel level thresholds, refueling events, and fuel consumption reports.
7. Testing the System
- Initial Test: Start the vehicle and check if the tracker is functioning correctly. Ensure it is receiving power and recording data.
- Data Verification: Verify the data by checking the fuel levels and comparing them with the actual readings.
- Adjustments: Make any necessary adjustments to the calibration or configuration settings.
8. Finalizing the Installation
- Secure any loose wires and ensure the tracker is firmly mounted.
- Double-check all connections and ensure the tracker is properly integrated with the vehicle’s systems.
Tips and Considerations
- Professional Installation: If you’re not confident in installing the tracker yourself, consider hiring a professional installer.
- Regular Maintenance: Periodically check the tracker and connections to ensure they remain in good condition and continue to function correctly.
- Firmware Updates: Keep the tracker’s firmware updated to benefit from the latest features and improvements.
Always refer to the specific installation manual provided by the manufacturer of your fuel-monitoring tracker for detailed instructions and safety guidelines.
Certainly! Here are additional detailed steps, considerations, and tips to ensure the successful installation and configuration of your fuel-monitoring tracker:
9. Advanced Configuration Options
- Integration with Fleet Management System: If you are using a fleet management system, integrate the tracker with the system’s software. This might involve entering an API key or using proprietary software provided by the tracker manufacturer.
- Setting Up Geofencing: Configure geofencing to receive alerts if the vehicle enters or leaves predefined areas. This can be useful for monitoring fuel consumption in specific locations.
- Data Export and Reporting: Set up automated data export and reporting features. This allows you to generate fuel consumption reports, refueling logs, and alerts for anomalies in fuel usage.
10. Testing in Real-World Conditions
- Drive Test: Conduct a drive test to ensure the tracker accurately monitors fuel levels during different driving conditions. Check for consistency in data reporting.
- Simulate Refueling: Perform a controlled refueling to see if the tracker correctly logs the event and updates the fuel level.
- Check GPS Functionality: Verify that the GPS tracking feature (if available) works correctly by tracking the vehicle’s movement.
11. Troubleshooting Common Issues
- No Power: If the tracker does not power on, check the wiring connections to the power source and ensure the vehicle battery is not depleted.
- Inaccurate Fuel Readings: If the fuel readings are inaccurate, recalibrate the fuel sensor according to the manufacturer’s instructions.
- Signal Interference: Ensure that there is no interference with the GPS signal. Relocate the GPS antenna if necessary to improve signal reception.
- Software Issues: If the tracker is not communicating with the app or software, check for firmware updates and ensure the tracker is properly configured in the software.
12. Safety and Compliance
- Follow Manufacturer Guidelines: Always adhere to the guidelines provided by the manufacturer for installation and use.
- Vehicle Warranty: Check if installing the tracker affects your vehicle’s warranty. Some installations might require professional installation to maintain the warranty.
- Legal Compliance: Ensure the use of the fuel-monitoring tracker complies with local regulations and privacy laws, especially if monitoring a fleet of vehicles with multiple drivers.
13. Maintenance and Upkeep
- Regular Inspections: Periodically inspect the tracker and its connections to ensure they remain secure and free from damage.
- Firmware and Software Updates: Keep the tracker’s firmware and associated software up-to-date to benefit from improvements and new features.
- Data Management: Regularly review and manage the data collected by the tracker. This helps in maintaining accurate records and optimizing fuel usage.
14. Enhanced Features
- Driver Behavior Monitoring: Some advanced trackers offer features to monitor driver behavior, such as harsh braking, rapid acceleration, and idling time. Configure these features to get insights into driving habits that affect fuel consumption.
- Remote Diagnostics: Use remote diagnostics features (if available) to monitor the health of the vehicle and receive alerts for potential issues that could impact fuel efficiency.
- Integration with Other Sensors: Integrate the fuel-monitoring tracker with other sensors like temperature sensors for refrigerated trucks, tire pressure monitors, etc., to get a comprehensive view of vehicle performance and efficiency.
15. Documentation and Training
- User Manuals: Keep all user manuals and installation guides handy for reference.
- Driver Training: Train drivers and staff on how to use the tracker, understand the alerts, and respond to potential fuel-related issues.
- Support and Warranty: Maintain records of the tracker’s warranty and support contact details for quick resolution of any issues.
By following these detailed steps and considerations, you can ensure a successful installation and configuration of your fuel-monitoring tracker, leading to more accurate fuel usage monitoring and better overall vehicle management.


